Orange Chiffon Cake
If you like light, airy, fragrant, melting-in-the-mouth cakes with lots of whipped cream icing; 'This' is the cake for you! I'd made it for my wedding anniversary some time back. We'd called a few friends over and this cake was rated as 'much much better than any professional cake' they'd eaten! In fact this cake is my favorite as it is always liked by everybody and is very good for making cake-based deserts.
I'd iced this cake with whipped cream and decorated with butter-icing stars ( the butter used was fresh, home-made) and chocolate leaves made by my son, a day in advance ( using melted chocolate and fresh rose leaves). You can decorate it in any way you feel like; it is just 'superb' with only cream too!
Ingredients:- (1)- 260 gm. flour, sifted; (2)- 280 gm. finely ground sugar (not icing sugar); (3)- 6 egg yolks; (4)- 7 egg whites; (5)- 1/2 tsp. cream of tartar; (6)- 3 level tsp. baking powder; (7)- 1 tsp. salt; (8)- 1 tsp. finely grated Orange zest; (9)- 150 ml.+150ml Orange juice; (10)- 1/2 tsp. Orange essence;
 (11)- 400 gm. fresh cream for icing and layering, whipped with 6-8 Tbsp. of icing sugar ( you can add more if you like it sweeter) and 1 tsp. of vanilla essence.
(12)- A few orange segments, skin removed, for layering. (13)- 100gm. fresh butter, mixed with approx. 50 gm, (or more as per your taste) sugar and 1/2 tsp. of vanilla essence, for decorating, (14)- A few chocolate leaves for decoration. These are made by spreading melted chocolate on the undersides of cleaned, fresh rose leaves which are then put in the fridge for a few hrs. and the leaves are gently pealed-off when the chocolate is set. You can easily do this work the previous day.
Method:- 1. Nicely clean and dry a 10 inch tube-pan. Do not grease or line it and, set the oven temp. at 150 C
2. Sieve together flour and baking powder 3-4 times, sprinkle salt over it and sift with hands to mix.
3. Beat together egg yellows and sugar till thick and creamy. Add zest and 150 ml orange juice and, lastly, sprinkle flour over the mixture and mix to combine. Keep aside.
3. Take egg whites in a dry and absolutely grease-free mixer bowl of your egg-beater, sprinkle cream of tartar over it and beat for a minute on medium speed. Increase speed to high, start adding sugar, a little at a time, and keep beating till it becomes stiff, shiny and smooth.
4. Add 1/4 of this egg mixture to the flour mixture and mix slowly,with gentle hands, to lighten the flour mixture and then tip the whole of the flour mixture in egg whites, slowly, and fold-in very gently using cut-and-fold method, taking care not to deflate the batter too much.
5. Pour this batter in the dry tube-pan. The batter will not be of the pouring consistency; it'll be fluffy but, you'll be able to push-pour it. Tap the pan on the table once or twice, to release any air bubbles trapped inside.
6. Put the cake in the pre-heated oven and bake for 1 1/2 hrs in a slow-moderate oven. There is temp variation in all the ovens so you better start checking after 1 hr. with a dry skewer. When it is done, it's top will also start to brown slightly.
7. Take the cake out of the oven when your skewer comes out clean and, hang the cake-containing pan upside-down immediately, for 2-3 hrs,. to cool completely. Cooling it in an upright position will deflate it.
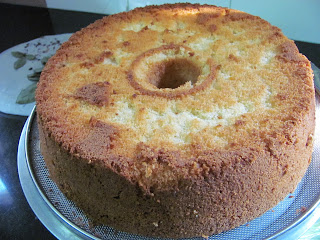 8. When completely cool, loosen it from the pan by running a knife around the edges. Invert it on a platter to take it out. If it is stuck to the base ( which some times happens); you'll have to push your fingers till the base and pull it gently around the edges to release it.
9. To make cutting the cake into layers easy, it can be wrapped in a plastic wrap and put in the refrigerator for an hour or so. In the meantime you can prepare whipped cream icing and butter icing along with skinned orange segments, broken into bits. The cream should be chilled before whipping. Stop when it reaches spreading consistency. Butter should be at room temp. Just mix sugar and vanilla essence into it and beat till it becomes smooth.


10. Now you have to cut the cake in two or three layers. put one layer flat on the serving plate and sprinkle half of the juice out of the remaining 150ml. You can sweeten this juice by adding some syrup or warming it with 2-3 tbsp. sugar till the sugar dissolves, and then cooling it. I'd cut the cake into two layers and made a furrow in the lower layer all around and, filled it with orange bits and spread the cream over it but, you can simply spread the cream on the cake surface, sprinkle some orange bits, broken into smaller pieces and cover with the second layer. Now, sprinkle the remaining juice on this layer. If you are making three layres, reduce the quantity of juice sprinkled over each layer accordingly.


11. Now, cover the whole cake, on all sides, with cream and smoothen the surface, as much as you can, with the help of a smooth-edged knife. If you want it smoother, as when you want to decorate it nicely for a party, you can keep some luke-warm water on the side and dip the knife in to warm it slightly and then smoothen the cream.
 12. Fill-up the prepared butter- cream in a piping bag and pipe a decorative pattern of your choice. You can use cream icing also, instead of butter-cream, for decoration but, butter-cream gives better-looking results as it is firmer.
13. Now you just have to arrange chocolate leaves as you like and your cake is ready for the party! You can leave-out the decoration if you like because people are going to remember only the taste of this cake!
14. Just cut a piece and start enjoying yourself! Or, if you've called friends over, see how it disappears!
Enjoy!


