Sunday, July 10, 2011

The Mango Mousse (egg-less)

                                                               The Mango Mousse

This Desert is ideal for those who are extra-sensitive to the smell of eggs and, is  a real treat for the summer (mango) months! Not difficult to make at all and a 'must try' for summers. It is very tasty on it's own too but, is 'real yum' when served with fresh, chopped mangoes and slightly whipped, pouring cream!

Ingredients- 1) Mango juice (tinned)- 400 ml.;    2) Pulp of ripe mangoes- 460 gm.;    3) Heavy cream or 'malai'- 330 ml for the mousse + 250 ml for serving;    4) Powdered sugar- 170- 180 gm. + 3-4 Tbsp. (or more/less, depending on your taste) to be mixed in the cream for serving;    5) Gelatin- 5 Tbsp.;    6) Skinned and chopped mangoes for decoration and serving- 2 ripe, firm mangoes;    7) Vanilla essence- 1/2 tsp.;    8) Dessicated coconut- 20-25 gms. (optional).     

Method-  
1. Sprinkle gelatin on the juice in a stain-less steel pan and keep aside to soak for 15-20 minutes.
2. When the gelatin has soaked-up some liquid and is swollen, add 60 gm. powdered sugar and put the pan on gentle heat, stirring frequently, till all the gelatin and sugar are dissolved. Keep aside to cool. You can cool it in a water-bath too.
3. Mix together mango pulp and 30-40 gm sugar in a blender till you get a smooth mixture.
4. Whip together 330 ml. cream and 80 gm. powdered sugar till sugar dissolves and cream is thick ( but not stiff). Beat the cream only when juice+ gelatin mixture has cooled down.
5. Now take a big bowl and mix together the juice+gelatin mixture; mango pulp and cream in it, with gentle hands, taking care that no unmixed juice is left at the bottom of the bowl. Lastly fold-in the dessicated coconut (optional).
6. Rinse a medium-sized mold (metal) to moisten it. Let all excess water drain-off. It should be only slightly moist (for the ease of unmolding later), not wet.
7. Pour the mixture in this mold and immediately put it in the freezer for 15-20 minutes after which it can be shifted to a lower shelf till it is fully set and firm to the touch.
8. When the mousse is set, take it out of the fridge to unmold. Warm some water in a big pan or wok (kadahi). Dip the mold containing mousse in warm water for 2-3 seconds. When you tilt the mold slightly, you'll see the mousse sliding a little. Now put the serving platter up-side down on the mouth of the mold and invert the whole thing together. The mousse will slide on to the platter along with some melted mixture. Put it in the freezer again for 10-15 minutes, to firm-up.
9. Now decorate the mousse by arranging some chopped mangoes on and around it. Whip 250 gm. cream with 3-4 Tbsp. of powdered sugar and vanilla essence ( more or less of both can be used depending on your taste) till sugar melts but cream is still of pouring consistency.
10. The only thing left now is serving and eating! Chill the desert in the freezer for a few minutes before serving; then pour cream over it and serve.


This desert doesn't take very long to make, nor is it very complicated but, it's still very very satisfying!


Enjoy!

Wednesday, June 29, 2011

Pineapple Souffle

                                              Pineapple Souffle- a light and yummy desert


This desert is 'melting-in-the-mouth' light and substantial at the same time! A perfect ending to a full meal. Not difficult at all, it only needs a little of your time.
Though it can be served on it's own, some fresh/tinned fruit on the side always enhance the taste.


Ingredients- 1. Eggs-6, separated;    2. milk- 400 ml.;    3. pineapple juice, tinned- 400 ml.;    4. heavy cream ('malai' will also do)- 300 gm.;    5. Sugar, powdered- 250 gm.;    6. Pineapple essence- 11/2 tsp.;  
7. Gelatin- 5 tbsp.;    8. Chopped, tinned pineapple- 1 small tin and, a few fresh cherries for decoration.

Method- (1)- First of all, separate egg-whites and yellows. Eggs should be at room temp. Put the egg-whites in a clean and dry mixer bowl, cover and keep them aside.  (2)- Now break egg-yellows, whisk a little and add milk and 80 gm. sugar. Make a custard of this mixture in a double boiler. If you don't have a double boiler, take two pans with one fitting on the mouth of the other. Take some water in one pan and put it on fire. Take the egg+ milk mixture in the other pan and hold it on the mouth of the lower pan and cook, stirring, till the custard thickens and coats the back of the spoon. It will be like a thin custard only. Take it off the heat and keep aside to cool completely. It can be cooled in a water-bath also. Add 1tsp.pineapple essence to it when it is cool. 
(3)- Take the juice in another pan and sprinkle gelatin granules over it and leave aside for a few minutes to soak.
 
In fact, this can be done before cooking the custard so that by the time the custard is cooked, your gelatin is all soaked-up and ready to be melted. Put the juice pan on slow fire, add 20 gm. sugar to it and stir gently so that gelatin and sugar both dissolve. Keep it aside to cool too. 
(4)- When both custard and juice mixture have cooled down, whip the cream lightly with 90gm. sugar and 1/2tsp. essence. Don't let it become stiff.

(5)- Pour the juice mixture over the cool custard, mix, and then tip the whipped cream in the mixture.
Now, put the whole mixture in a cool place or, preferably, in a fridge so that it starts 'setting'.
(6)- When you feel that the mixture is thickening and is about to set, it is time to beat egg-whites.
Beat egg-whites at 'medium' for thirty seconds and then at 'high' till they are nicely frothy and start stiffening. Now start adding powdered sugar, 1tbsp. at a time, while beating continuously, till stiff peaks are formed. The sugar needed here will be 60-80 gms., depending upon how sweet you want it.
Note- One golden rule, to be always applied, is- test-check each mixture separately. Sugar should be 'just right' in each. You can add more at any stage except after folding the egg-white in. 
(7)- Take-out the half-set mixture from the fridge, beat it to a thick slushy mixture, devoid of lumps and then fold-in the beaten egg-whites, by 'cut and fold' method. 
(8)- Rinse two medium-sized metal pudding bowls with water to moisten them. Let extra water drain-off and then divide the mixture equally between the two. Put both the bowls in the freezer for 10-15 minutes and then in the midle of the fridge till fully set.
(9)- Once the souffle is set, it has to be unmolded. For unmolding, heat some water in a wok or 'Kadahi'; dip the bowls one by one in the hot water for a second or two. Put the serving platter on the mouth of the bowl and turn the whole thing upside-down together. The souffle will slide onto the plate along with some melted liquid. Put the platters in the freezer for 10-15 minutes so that it again firms-up nicely.
(10)- The last step is decoration. You don't have to do anything much. I just sprinkle some fresh/ tinned fruit around. If you like elaborate decoration, you can go for whipped cream and piping bag too. But it sure looks very tempting with just fruit.


This is a 'must try' desert; simple and light.

Enjoy!

Thursday, April 14, 2011

Yummy Chocolate Brownies

Chocolate Brownies

An all-time favorite! Chocolate brownies are something you can not have enough of! They are easy to make and yet so tasty and enjoyable as an 'any-time' snack!

Ingredients:-   1. 150 gm semi-sweet chocolate, chopped in to very small pieces;    2. 1 heaped Tbsp.(approx. 10-15 gm.) cocoa powder;    3. 100 gm. flour;    4. 180 gm. ground sugar;    5. 3 eggs;    6. 115 gm. fresh, unsalted butter;    7. 1 tsp. vanilla essence;    8. 2 pinches salt.

Method:-    1. prepare an 8 inch square baking pan by greasing and dusting it and set oven temp at 175 C.
2. Melt chocolate and butter in a double boiler or, take butter and chocolate in a steel saucepan that can fit over the mouth of another pan; pour some water in this (lower) pan and put it on a stove; hold the pan containing chocolate and butter on it's mouth and let it heat slowly; don't let the water in the lower pan boil vigorously as it should only simmer; stir occasionally and the chocolate-butter mixture will be melted in a few minutes. Remove from heat and add sugar and cocoa. Stir nicely to mix and, keep it aside to cool.
3. Beat eggs in an egg-beater, with vanilla essence, till smooth. Now add beaten eggs to the cool chocolate mixture, in 3-4 additions and mix well. Lastly mix-in flour and salt.
4. Pour the prepared batter in the baking dish and bake for approx. 35 min. It is better to start checking after 30 min. It is done even if a clean skewer inserted in the center comes out with a few moist. crumbs ( but not wet batter). Over-baking may spoil the texture so take care. Remove from the oven when done and let cool in the baking dish only, placed on a wire rack.
5. When thoroughly cooled, cut in to pieces with a sharp knife. These can be kept in an air-tight container for two weeks but that won't be required as, these never last for more than a few minutes!     

These are quick, easy-to-make and very very tasty; an unbeatable combination!

Sunday, April 10, 2011

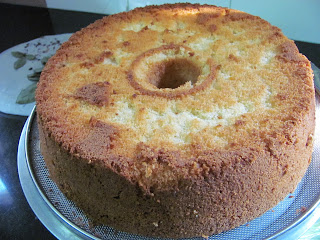
Orange Chiffon Cake


Orange Chiffon Cake 


If you like light, airy, fragrant, melting-in-the-mouth cakes with lots of whipped cream icing; 'This' is the cake for you! I'd made it for my wedding anniversary some time back. We'd called a few friends over and this cake was rated as 'much much better than any professional cake' they'd eaten!
In fact this cake is my favorite as it is always liked by everybody and is very good for making cake-based deserts.
I'd iced this cake with whipped cream and decorated with butter-icing stars ( the butter used was fresh, home-made) and chocolate leaves  made by my son, a day in advance ( using melted chocolate and fresh rose leaves). You can decorate it in any way you feel like; it is just 'superb' with only cream too!  


Ingredients:-  (1)- 260 gm. flour, sifted;     (2)- 280 gm. finely ground sugar (not icing sugar);     (3)- 6 egg yolks;     (4)- 7 egg whites;      (5)- 1/2 tsp. cream of tartar;     (6)- 3 level tsp. baking powder;     (7)- 1 tsp. salt;     (8)- 1 tsp. finely grated Orange zest;     (9)- 150 ml.+150ml Orange juice;     (10)- 1/2 tsp. Orange essence;    
(11)- 400 gm. fresh cream for icing and layering, whipped with 6-8 Tbsp. of icing sugar ( you can add more if you like it sweeter) and 1 tsp. of vanilla essence.
(12)- A few orange segments, skin removed, for layering.     (13)- 100gm. fresh butter, mixed with approx. 50 gm, (or more as per your taste) sugar and 1/2 tsp. of vanilla essence, for decorating,      (14)- A few chocolate leaves for decoration. These are made by spreading melted chocolate on the undersides of cleaned, fresh rose leaves which are then put in the fridge for a few hrs. and the leaves are gently pealed-off when the chocolate is set. You can easily do this work the previous day.
Method:-  1. Nicely clean and  dry a 10 inch tube-pan. Do not grease or line it and, set the oven temp. at 150 C
2. Sieve together flour and baking powder 3-4 times, sprinkle salt over it and sift with hands to mix.
3. Beat together egg yellows and sugar till thick and creamy. Add zest and 150 ml orange juice  and, lastly, sprinkle flour over the mixture and mix to combine. Keep aside.
3. Take egg whites in a dry and absolutely grease-free mixer bowl of your egg-beater, sprinkle cream of tartar over it and beat for a minute on medium speed. Increase speed to high, start adding sugar, a little at a time, and keep beating till it becomes stiff, shiny and smooth.
4. Add 1/4 of this egg mixture to the flour mixture and mix slowly,with gentle hands, to lighten the flour mixture and then tip the whole of the flour mixture in egg whites, slowly, and fold-in very gently using cut-and-fold method, taking care not to deflate the batter too much.
5. Pour this batter in the dry tube-pan. The batter will not be of the pouring consistency; it'll be fluffy but, you'll be able to push-pour it. Tap the pan on the table once or twice, to release any air bubbles trapped inside.
6. Put the cake in the pre-heated oven and bake for 1 1/2 hrs in a slow-moderate oven. There is temp variation in all the ovens so you better start checking after 1 hr. with a dry skewer. When it is done, it's top will also start to brown slightly.
7. Take the cake out of the oven when your skewer comes out clean and, hang the cake-containing pan upside-down immediately, for 2-3 hrs,. to cool completely. Cooling it in an upright position will deflate it.
8. When completely cool, loosen it from the pan by running a knife around the edges. Invert it on a platter to take it out. If it is stuck to the base ( which some times happens); you'll have to push your fingers till the base and pull it gently around the edges to release it.
9. To make cutting the cake into layers easy, it can be wrapped in a plastic wrap and put in the refrigerator for an hour or so. In the meantime you can prepare whipped cream icing and butter icing along with skinned orange segments, broken into bits. The cream should be chilled before whipping. Stop when it reaches spreading consistency. Butter should be at room temp. Just mix sugar and vanilla essence into it and beat till it becomes smooth.  

10. Now you have to cut the cake in two or three layers. put one layer flat on the serving plate and sprinkle half of the juice out of the remaining 150ml.  You can sweeten this juice by adding some syrup or warming it with 2-3 tbsp. sugar till the sugar dissolves,  and then cooling it. I'd cut the cake into two layers and made a furrow in the lower layer all around and, filled it with orange bits and spread the cream over it but, you can simply spread the cream on the cake surface, sprinkle some orange bits, broken into smaller pieces and cover with the second layer. Now, sprinkle the remaining juice on this layer. If you are making three layres, reduce the quantity of juice sprinkled over each layer accordingly.  

11. Now, cover the whole cake, on all sides, with cream and smoothen the surface, as much as you can, with the help of a smooth-edged  knife. If you want it smoother, as when you want to decorate it nicely for a party, you can keep some luke-warm water on the side and dip the knife in to warm it slightly and then smoothen the cream.
12. Fill-up the prepared butter- cream in a piping bag and pipe a decorative pattern of your choice. You can use cream icing also, instead of butter-cream, for decoration but, butter-cream gives better-looking results as it is firmer.
13. Now you just have to arrange chocolate leaves as you like and your cake is ready for the party! You can leave-out the decoration if you like because people are going to remember only the taste of this cake!
    
14. Just cut a piece and start enjoying yourself! Or, if you've called friends over, see how it disappears!


Enjoy!

Saturday, March 26, 2011

Delicious Orange- Chocolate Cake

                                                           Orange-Chocolate Cake

There can not be any person living on this earth that will not 'just love' this cake! Many find it to be the 'best' cake they've ever eaten!
I made this cake recently, for my little brother (cousin's) engagement; iced it with 'ganache' and decorated with fondant roses, arum lilies, lemon blossoms and leaves and, oranges and their leaves made of egg-less almond marzipan.It's been sometime since I made it  now but, people are still
raving about it! In fact I made a number of this cake again, a few days back, to take to 'IIT Kharagpur' for Richie's friends and, it was a super-duper hit again! Whether you are a chocolate lover or not,I'm sure you'll just love it! 

Ingredients:-  
(A) For the cake -- (1) Flour- 150 gm.     (2) 11/2 tsp.     (3) Vanilla extract- 1 Tbsp.     (4) Fresh, unsalted butter- 260 gm.    (5) Sugar- 200 gm.     (6) Eggs- 5 large or, 6 medium     (7) semi-sweet dark chocolate- 300 gm.,chopped into small pieces     (8) Orange juice, preferably fresh- 100 ml.     (9) Orange zest, grated- of 11/2 medium oranges     (10) 1 Tbsp.orange liqueur or 1/4 tsp. orange essence (optional). 
(B)  For the Chocolate-glaze icing --  (1) Fresh unsalted butter- 1 Tbsp.    (2) semi-sweet dark chocolate-200 gm.     (3) Heavy cream ( fresh 'malai' will also do)- 220 gm.     (4) Powdered sugar- 4 Tbsp.     
(5) Vanilla essence- 1 tsp.
(C)  For decoration--  (1) a few marzipan oranges and leaves;     (2) some orange blossoms made with white 'fondant' along with leaves and twigs of green fondant;     (3) a few roses and rose-buds made with white fondant;     (5) a few Arum lilies made with white fondant;     (6) silver-coated sugar balls.

Method:-
(A)  Cake -     1. Set oven temp. at 160 C; prepare 10 inch tube-pan by lining with greased butter paper.
For the bigger cake shown in the above picture, I'd used double the recipe so I double-lined that pan and reduced the temp. to 150 C. It took 1 1/2 hrs. Some batter was surplus so I made two cupcakes too.
2. Cut butter into small chunks. Butter and chopped chocolate should be at room temp. Fill a small pan 1/4 with water and put chocolate, butter, juice and zest in another saucepan that can be fitted on the mouth of the pan containing water. 
Now, put the pan with water on medium heat and hold the pan with chocolate-butter on it's mouth, to melt slowly. Direct heat or high heat 'seizes' the chocolate, i.e. it'll become a 'lump' instead of melting so the water should be barely simmering and should not touch the bottom of the pan containing chocolate. If the water comes to a vigorous boil, reduce the heat to low. Stir occasionally. Once the chocolate and butter are nicely melted and mixed, remove from fire and keep aside to cool. Liqueur or essence can also be added at this stage, if desired ( I used essence).
3. Sieve flour and baking powder together 3-4 times, to mix nicely and, keep aside till required.    
 4.  Beat eggs, powdered sugar and vanilla in a mixer, first at 'medium' and then at 'high' till the mixture is thick, creamy and more than double in size.
5.  Pour the cool chocolate mixture over the egg mixture and fold gently to incorporate. Care should be taken not to deflate the eggs much so, avoid beating; cut-and-fold method is best.
6.  Sprinkle sieved flour over the chocolate-egg mixture and fold with very gentle hands till all the flour is mixed and no lumps remain. It will be a pouring-consistency batter.
7.  Tip the batter in the prepared pan and bake till done. It should take approx. one hour. My bigger cake took 11/2 hrs. as I'd doubled the quantity for it. When done, take out of the oven and let it cool in the tin; only loosen the sides after about 10 minutes.
8.  Now, for the smaller cake too, proceed in the above manner only. The quantity of the batter will be excessive so you can make 4-5 more cup cakes which are a favorite of children any time! I used a 6 inch pan for the smaller cake; kept the temp. at 150 C only and it was done in one hour. Let both the cakes cool completely.
(B)  Icing -    The best glaze for this cake is- the Chocolate Ganache and, this is how we prepare it-
1. Put chopped chocolate, butter, powdered sugar and vanilla essence in a bowl.
2. Take cream in a saucepan and bring it to the boiling point. Immediately pour this boiling cream over chocolate in the bowl, cover with a lid and leave for 5 minutes.
3. Stir the mixture gently so that melted chocolate, butter and sugar are nicely mixed. This is our Ganache for the icing. Do not beat it as we do not want any air to be mixed in it. Ganache should be absolutely smooth. Let it cool slightly.
4. Put both the cakes on wire racks and place each rack on a tray (to catch drippings). Pour warm ganache gently on the cake, starting with the center and moving outwards. Pour around the edges also so that sides are also nicely covered. If any areas are left out, apply some icing there with a knife. Let it set for a few minutes. If you like thicker icing on your cake, pour it on the cake a second time. This time it should be cooler but still warm.
5.  Ice both the cakes and cupcakes in the same manner. For the bigger cake double quantity of icing should be made. Let cool and set. Can be put in the fridge also, for setting. You'll get a nice shining icing.
6. Collect all the dripped icing from the trays, mix it with the left-over icing and keep in the fridge. It'll make nice 'truffles'! ( see my blog of 5/31/10).
(C) -   Decoration-      I decorated the cake with fondant  flowers, marzipan oranges and sugar balls but, you can decorate it any way you feel like; it'll taste just as great!  


Enjoy!


Tuesday, February 1, 2011

Very delicious Biscuit Pudding

                                           Very easy and very delicious 'Biscuit Pudding'


This dessert is so easy, even a novice at cooking can make it and still earn more praises than a professional chef! The only thing it needs is some of your time and some very basic, easily-available ingredients! And still it looks (and tastes) as elaborate as the most elaborate of them! 
I fancy myself a good cook and I like preparing and eating fancy desserts but, this simple dessert is my son's absolute favorite! I strongly recommend it for EVERYBODY! 
You simply MUST try it!

Ingredients:-  (1) Parle-G glucose biscuits- 50-55 in no.;    (2)  Heavy cream or, 'malai'- 400gm.(+ 1Tbsp.)
(3) Cocoa powder- 15 gm.;    (4) powdered sugar- 100gm.;    (5) Vanilla essence- 1 tsp.;   (6) Instant coffee powder- 1 tsp., heaped;    (7) milk- 3/4 cup;    (8) 2-3 small squares of 'milk' or 'semi-sweet' chocolate (chopped) along with a tablespoon of cream for the top swirl;   (9) Jelly- 1 pkt. (any color and flavor);   (10) Custard made with 1/2 litre milk.

Method:-    1)-  First of all, beat cream, vanilla and sugar in a mixer, at medium-high speed, till it thickens slightly but is not stiff. Stop the mixer and remove abut 75ml. of the prepared cream to keep aside (or, in the fridge if the weather is warm) till needed later. To the rest, add cocoa powder and mix gently to make a smooth mixture. Keep this also aside (or in the fridge) till needed.


     2)-  Now, crush about 6 biscuits into a coarse powder, with the help of a roller pin ('belan').  


   3)-  Warm the milk with coffee and let it cool down to room temperature. Now you are ready to assemble the dessert. 
   4)- Divide the powdered biscuits into 4 parts and spread one part on the base of the bowl in which you want to set the dessert and then, spread a layer of biscuits over it after dunking each biscuit in the prepared coffee-milk. Don't let the biscuit become soggy; dip each of it just for a split second, only to moisten it.


   5)-  Once the base has been covered with a layer of biscuits, spread about1/5 of the prepared chocolate-cream over it. If there are empty spaces left in the bowl, you can cover them with pieces of biscuits, as I did. I needed about 10 biscuits for one layer and about 40 in all for the 4 layers, it'll depend upon the size of your bowl. You can easily make four layers of 12 biscuits each with this much cream (4 columns and 3 rows). After completing one layer, sprinkle another 1/4 of the biscuit powder. It helps in absorbing the extra moisture and keeping the layers separate.                                      


6)-  In the same manner, prepare all the four layers. Smoothen the cream on the top layer as best you can and put cream on the sides also, to fill-up the gaps. This filling of gaps with cream is not actually necessary. It is just for decorating the dessert nicely. Now put the remaining cream in a piping bag and squeeze out two rows of rosettes or, any pattern of your choice. You'll see that you have created a sort of 'well' in the center, for the remaining whipped cream ( the one without cocoa).  


7)-  Pour the whipped cream, that was kept aside, in the middle. Melt chopped chocolate and 1 Tbsp. cream in a double boiler or, by holding the pan on the mouth of another pan containing gently simmering water ( as I'd shown in an earlier blog, while making 'mascarpone'). You can add a tsp. of powdered sugar also, to this mixture before you start to warm it. Stir gently and occasionally till the chocolate is melted. Now pour this melted chocolate on the cream in a swirly pattern. Run the tip of a knife through it and you'll get a pattern resembling the one in the picture.
Note- This chocolate swirl is not necessary at all! You dessert will be just as tasty without it also so skip this step if you are discouraged by the chocolate-melting process!
   8)-  Now your pudding has been assembled. Put it in the fridge for a few hours (atleast 2 hrs.) to 'set' and then, in the freezer for half an hour to chill it nicely.
  9)- While the dessert is resting in the fridge, prepare jelly as per the directions given on the packet and, also prepare slightly thick, pouring custard, as per directions on the packet ( you'll have to use slightly more quantity of the custard powder to get a bit thicker pouring custard). When both the things come to room temp., put them in the fridge. You can put the custard-pan in a water bath for cooling it quickly. 
  10)-  To serve, cut wedges of the set dessert with a sharp knife and put a serving of jelly and custard each, on the side and see how your friends and family members relish it!


This is one of the 'easiest to make' desserts and yet, one of the tastiest to eat. I strongly recommend that you try making it and I'm sure you'll keep repeating it! 


                                                                             Enjoy!


Sunday, January 23, 2011

Marzipan Fruits


                                                 Fruits made with homemade Marzipan. 


             Marzipan is a sweet dough, used for covering the cakes as a base for icing or, making cake decorations or, for making sweetmeats too like small balls covered in chocolate etc.
            I made marzipan fruits two days back for which I made the marzipan at home only as it is  
not available in the market in my city. My marzipan was different as I did not make it in the traditional way. I am a bit averse to using raw egg-white which is used for binding the marzipan dough so, I thought of using dissolved gelatin instead. The end product is a little different but it served the purpose and, I found the dough more pliable though a bit sticky for which I had to wash my hands often.                                       
        This is how I made the marzipan dough and then, fruits with it--
                                                                                    
 1.    The first step is to crush the almonds (with skins) in the electric grinder. Give it very small pulses; don't grind for long in one go otherwise almonds start oozing oil. Every time you grind almonds, put them in a flour strainer and shake nicely over a news paper. You will get a small amount of very fine almond powder. Return the rest to the grinder, add some more almonds and pulse again. This process is time-consuming. 
        Remember, you'll get only 1/3 amount in powder form. Grind the rest some more to get a coarse powder, which will be slightly lumpy.
        The fine powder can be used to make very smooth fruits, flowers or, for covering the cakes. The coarse powder can be used for many other fruits and leaves ( as I have done) or, for making sweets also. 


2.    The second step is to dissolve the gelatin. I used 5 teaspoons of lemon juice, to give it a nice tang and mixed it with 7-8 tsp. of water. You can use all water instead. Now sprinkle 1 tsp. of gelatin over it ( in a small metal pan) and leave it to soften for 10 minutes after which time the gelatin will swell-up. Just held it over low heat, shaking slightly, till gelatin is dissolved.completely.

3.    The third step is to knead the dough. You should take equal amounts (by weight) of almond powder and icing sugar. I took 80 gms. each of the almond powder and icing sugar. Sprinkle 4-5 tsp. dissolved gelatin over it and mix with fingers. Also add 1 tsp. of edible glycerin and a few drops of almond essence. The dough will be sticky initially but as you keep kneading, it'll become smooth like children's modeling clay. If you find it too wet, add some more icing sugar and knead till smooth. You can keep this dough for a few days in an airtight container.  
4.    Now comes the fruit-making part. I've used only the coarse powder yet and made some strawberries, guavas and oranges. Here is how you've to go about it-
Take a lump of the dough and mix the desired color in it. I tried making straw-berries first so I mixed a few drops of strawberry color. Mix the color by folding the dough over itself again and again and then knead till you get a nice uniform color.


In the same manner green and orange colors can also be made.
 (1)   To make strawberries, take a small lump of marzipan, roll it into a round shape and then taper it at one end. Cut a star shape from the green marzipan to make leaves.           

     Now apply some water on top of the strawberry with a brush, put the star on top and stick it by pushing with the back of the brush.                                                     


Use a toothpick to create the dimpled effect.  


  (2)   To make guavas, roll a portion of the green marzipan into a round shape roughly resembling a guava. Take a clove and remove the center bulb of it's flower. Insert the stem into the green sphere so that only the flower is visible. Insert the flower portion on the other end of the sphere to make the stem. Your guava is ready.


    (3)    Next, to make oranges, roll some orange dough into a perfect round and roll it softly over the slots
        of a grater (with small slots) to create the rough surface of an orange. Next, insert the flower-end of a clove
        on one end, to create the stem and your orange is ready. 


     To create the greenish effect on the skin, mix 2 drops of green color with one drop of orange-red and apply the resulting color very lightly with a brush, on some portions of the orange. It brings a very realistic look.
(4)    Lastly, to make leaves, all you have to do is flatten small portions of the green marzipan between your finger and palm and, cut into desired shapes. The veins can be created by pressing the back of a knife on the leaf.  


(5)    Leave these fruits and leaves to dry for a few hours and then put in a flat air-tight container on wich a piece of polythene has been spread. cover with another piece of polythene and close the lid.


Note- As this dough is a bit sticky, keep you hands clean and dry by frequent washing and drying, if you want good results. 
I have not used the fine powder yet. That'll make another post! First you try making these easy fruits and enjoy eating them too!


                                                                                 Enjoy!